Click For Docs:
Overview
How-to
How-to Overview
Deploy Image Algorithm
Deploy Audio Algorithm
Deploy Video Algorithm
Deploy Text Algorithm
Deploy Json Algorithm
Decide on a Server
Use Elastic Inference
Make an iOS App
Website for Algorithm
Use Swagger
Using Algorithm Cloud
API Types
API Types Overview
Image Data Type API's
File Data Type API's
Text Data Type API's
Audio Data Type API's
Video Data Type API's
Arrays Data Type API's
JSON Data Type API's
FAQs
More Resources
Video Algorithms
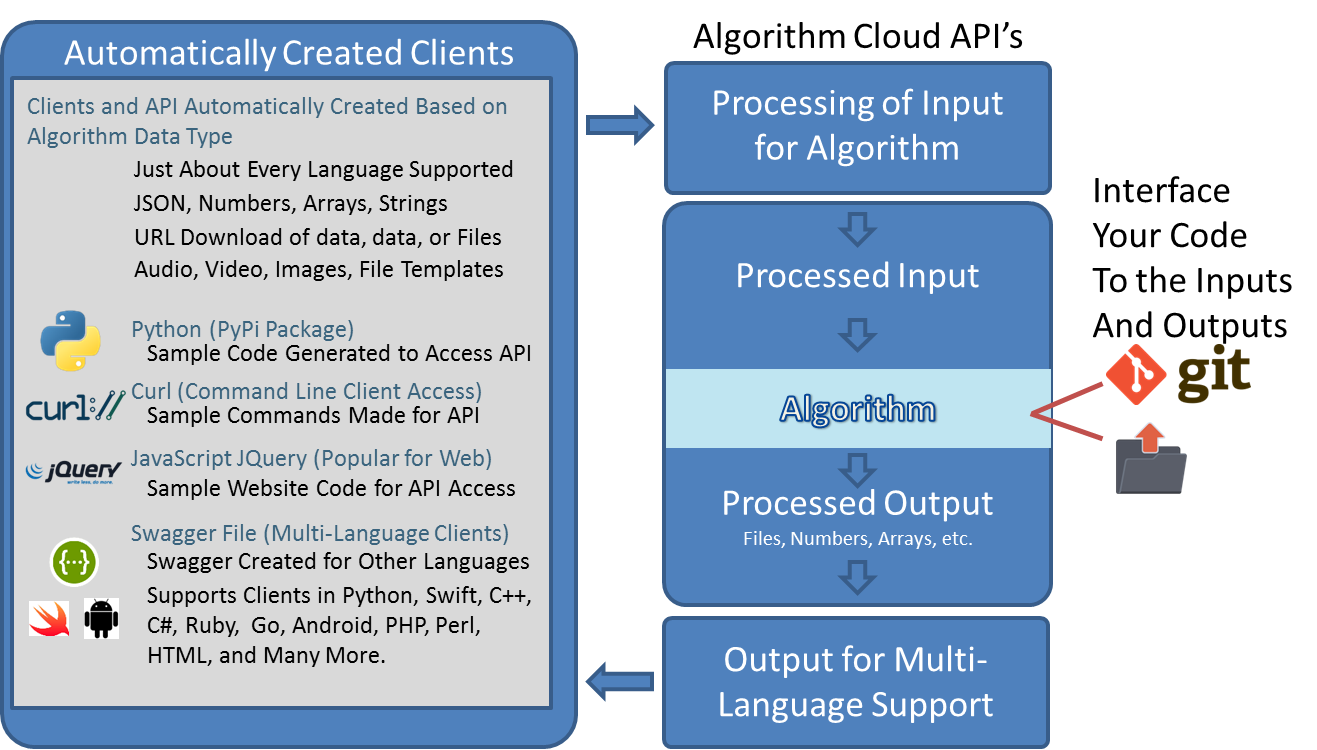
- Shown in an overview of how clients connect with native languages or with swagger files.
- Specific to video, a python class is generated with input/outputs in one of the ways defined
- Notice just about every form of input/output are available for algorithm needs
- Your algorithm can process, files, Numpy arrays, JSON, arrays and output similar data types
- Common inputs/outputs are receiving files and returning files or returning JSON with information about the video file extracted.
- Algorithm Cloud currently supports 2 different types of API inputs and outputs of algorithms, if you need something else, contact us and we may be able to generate it for you. Specific to the API's your client can download files, or provide inputs to the API in different ways and the server will provide the data in the form specific to the algorithm input/output defined in the figures below.
Security certificates, API code, server settings, software dependencies, clients, and production webservers are generated for your needs related to processing video.

The following is an example of how to deploy an algorithm in Algorithm Cloud
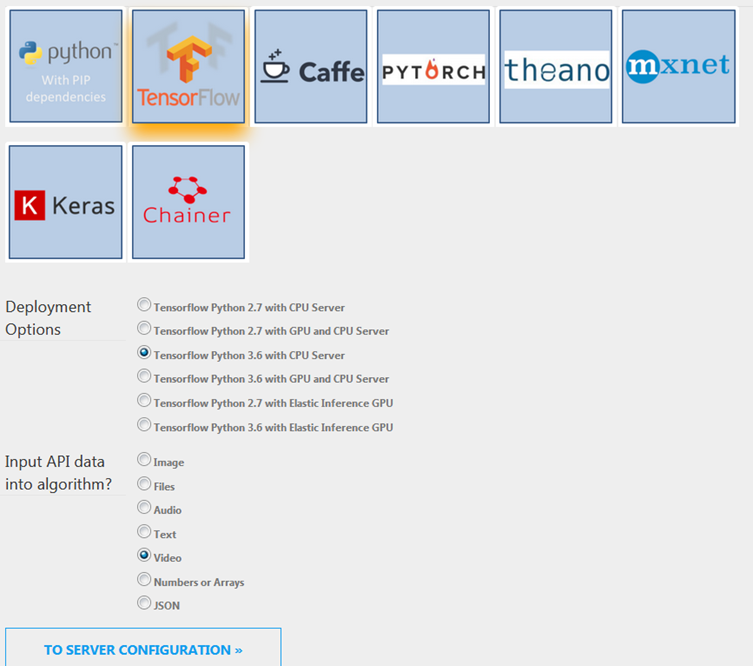
Select Data Type, Environment Type:
- Shown is the first page of Algorithm Cloud to deploy your video algorithm.
- Select a python environment pre-setup or you can specify your own dependencies in steps following and by just selecting Python.
- Next select if you want to use a GPU based server, CPU based server, or if supported by the framework an Elastic inference server. We select a CPU server for the purposes of this example.
- Finally, select "Video" as we are choosing from one of the API's discussed above and click "To Server Configuration".
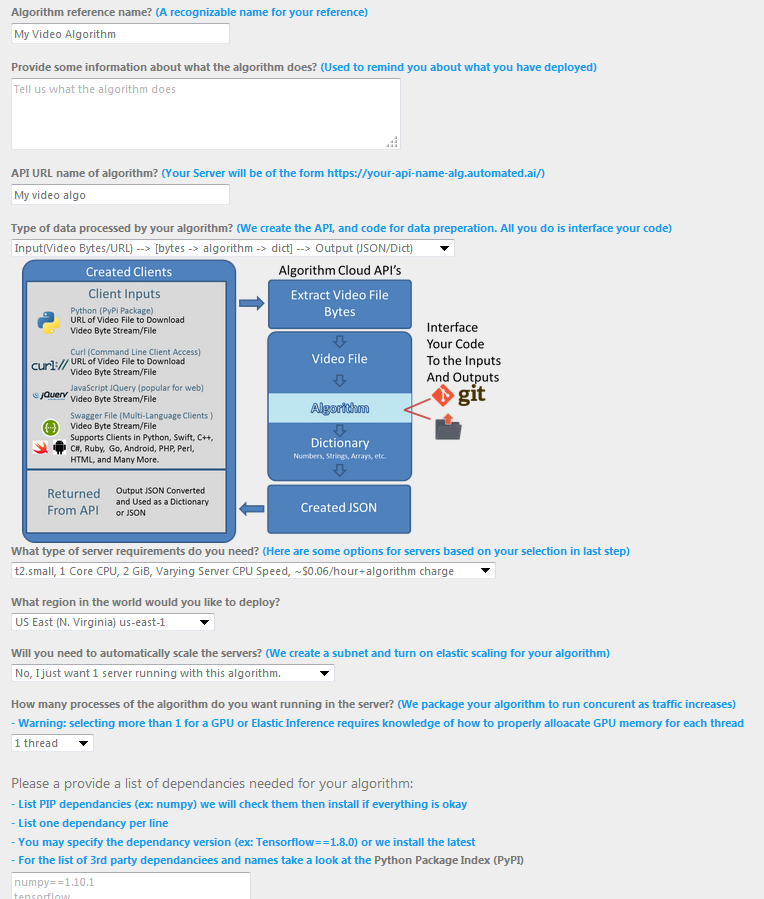
Select Server, Naming, Dependencies:
- Provide an Algorithm Reference Name for your algorithm and displayed when managing the algorithm.
- Provide a short description that tells what the algorithm also used in algorithm management for reminders on the algorithm function.
- Name the API that will be used to create a signed certificate for SSL for a generated domain name preceding automated.ai used as the endpoint to access your algorithm.
- Select the type of data processed by the algorithm. Each selection will display a data flow in and out of the platform and algorithm. For this example we are selecting an api that takes in a link to an video file to download or input as video bytes that the platform extracts for your use. The API generated shows you how to process the data coming in and returns a JSON string that contains information extracted from the video file.
- Select a server Type based on algorithm needs, typically you will just need a t2.micro/small (small recommended due to increased network speed and RAM) for CPU based deployments, but you may wish to adjust the number of threads in CPU deployments that can use the increased computation.
- Select the region you would like to run algorithms out of. For this example, we selected N. Virginia.
- Select the number of threads you want your algorithm packaged as that scales in the webserver and uses the different threads based on algorithm traffic.
- Lastly, when the server is created you may specify any python dependencies to install in the server. Once the server is up and running in a step to come you may install further dependencies but at this step it will be installed at server creation.
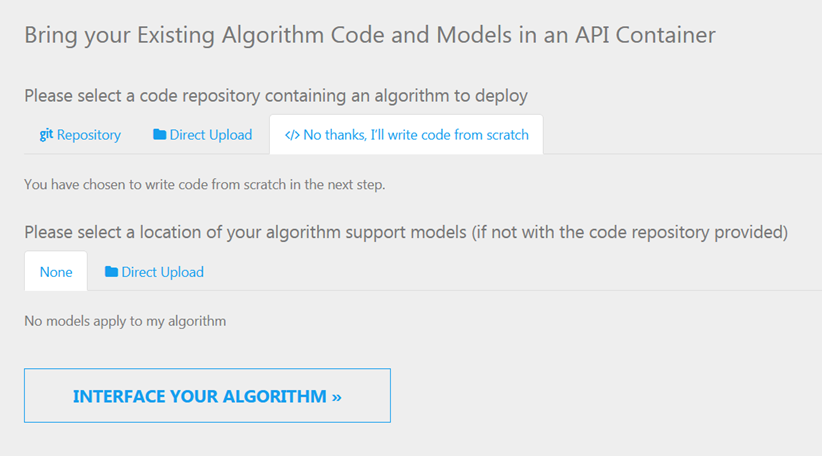
Code Repo Integration
Select code from GIT or a direct upload code to be used as an algorithm.
- Select code from GIT or a direct upload to supply your algorithm to be deployed as an API.
- Select extra models to add into the repo (ex. Deep learning models trained).
- Select "Interface Your Algorithm" to proceed.
Integrate Algorithm into API
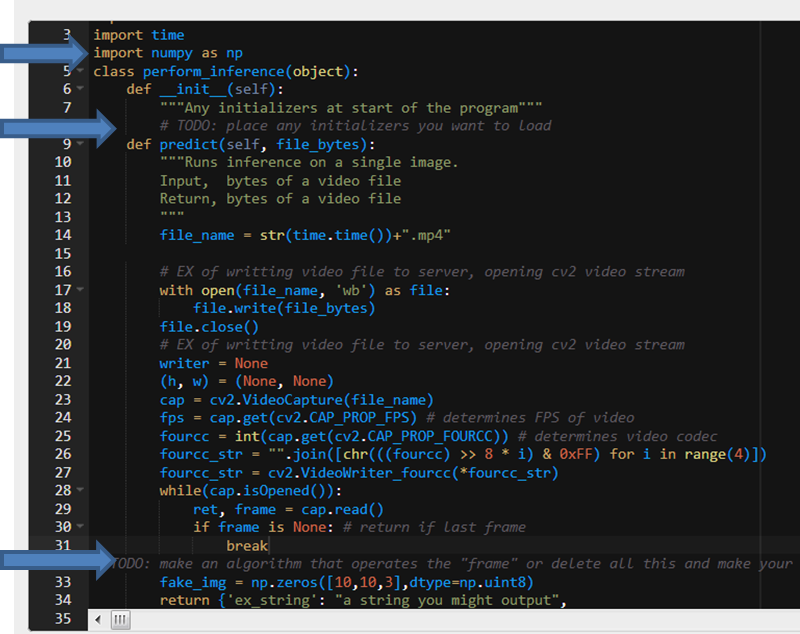
Code Integration in aai_main.py
- Add any imports you may need. Some are auto-generated.
- Add any models or code you want to load at the start of the program in __init__: as show in the picture. Store with "self." and access with "self." in predict(..):
- Add any code to process based on inputs and outputs in predict(…):
- The input and output data types are clearly defined. In the example video bytes are defined with a JSON/Dict returned and the video file is processed frame by frame.
- Returned is a Dict that is sent to the various clients as a JSON.
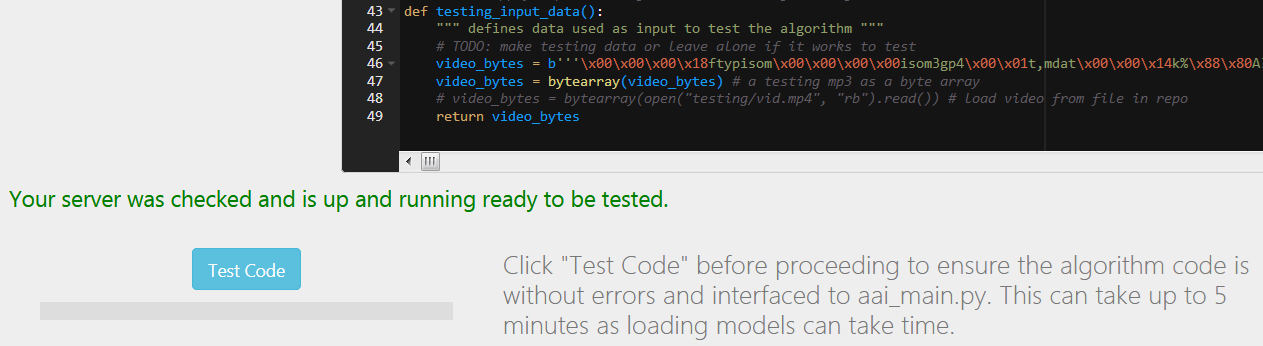
Testing Your Code in The API
- Test your code to make sure the API runs. Errors will be reported back.
- Code is tested with the testing_input_data(): method to produce the testing input.
- The site will tell you when the server is booted and ready to be tested. All that is required is clicking "Test Code"
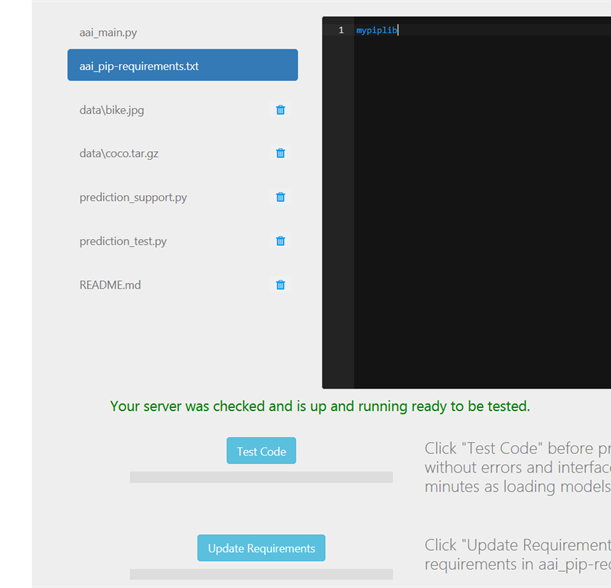
Add More Dependencies
While testing if other dependencies are required then they can be added with the steps bellow
- Select aai_pip-requirements.txt
- Provide more dependencies beyond what you provided in the server setup steps if errors exist when integrating code related to dependencies.
- You may add versions with == sign. Ex. myPIPpackage==0.1.1
- Click “Update Requirements”.
- Then “Test Code” to retest and deploy the Algorithm.
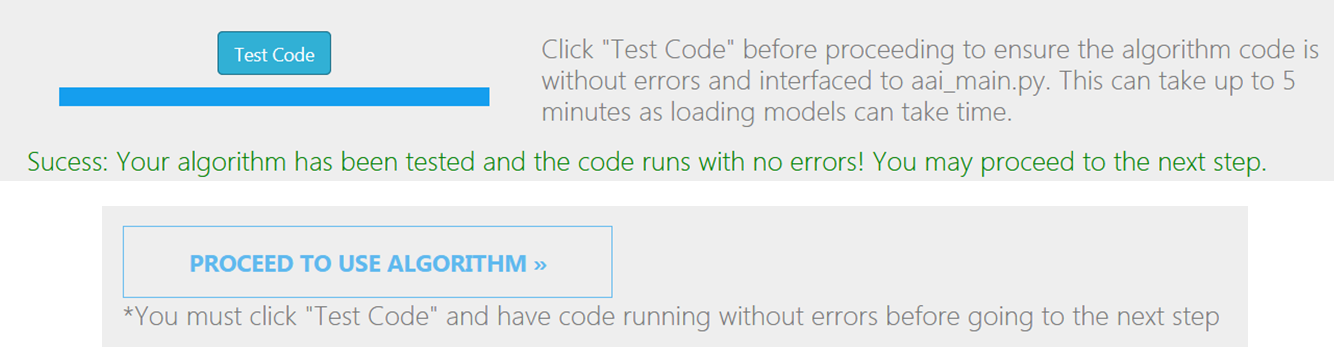
Completion of Testing
Almost ready to deploy your algorithm.
- With Success of “Test Code” you may proceed to using your algorithm.
- Go to the next step to use your algorithm
Using the Algorithm
Algorithm Clients
- Code is auto-generated to use the deployed algorithm with different clients
- Python: Depending on data flowing a variety of ways to input and output the data into and out of the algorithm are generated.
- Curl: Command Line version using the algorithm.
- JQuery: A JavaScript example website is generated to access and use the algorithm.
- Swagger File: Allows for Clients in any language to be generated.
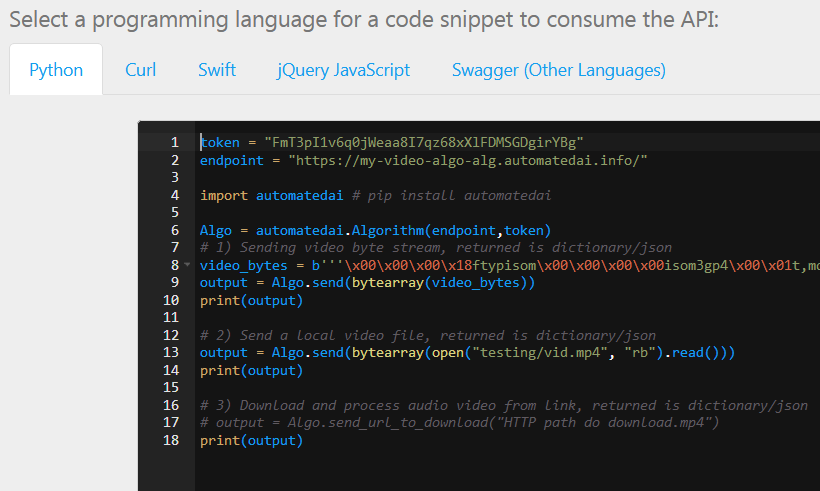
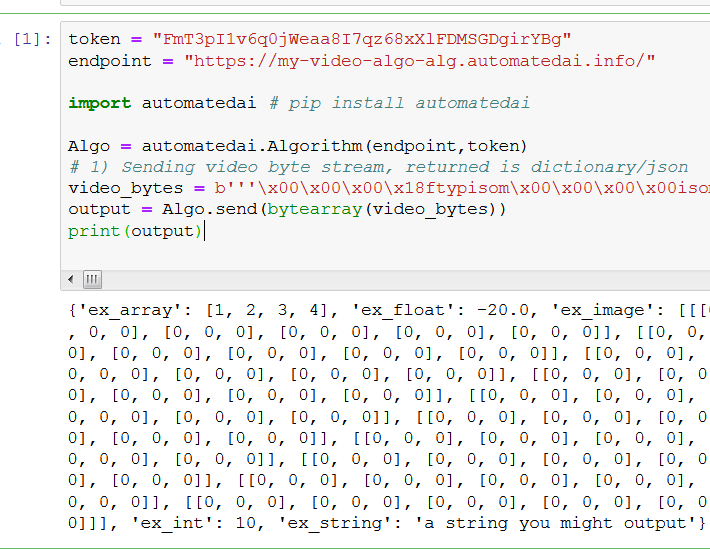
Python Client
Using Python Clients
- Using the python Code generated that uses the automated.ai PyPI library (pip install automatedai).
- See Automated.ai PyPI package
- You can access and use the algorithm with just a few lines of code as shown in the Jupyter Notebook based on the sample code provided.
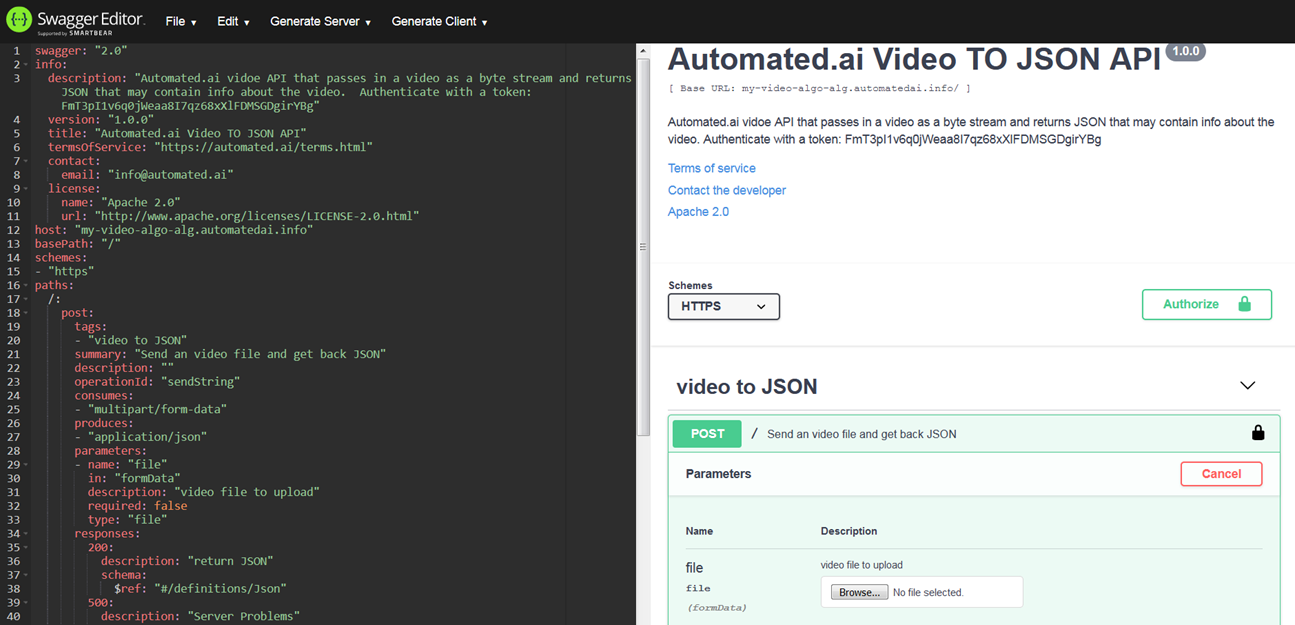
Generating Clients with Swagger
Swagger Clients
- See http://editor.swagger.io/
- Swagger can be used to generated clients.
- Your swagger file is generated, simply cut and paste the file into a swagger editor and then you can test.
- Click Authenticate and past the Token provided into the prompt.
- Click on the POST and click Try it Out.
- Select an video file and click Execute.
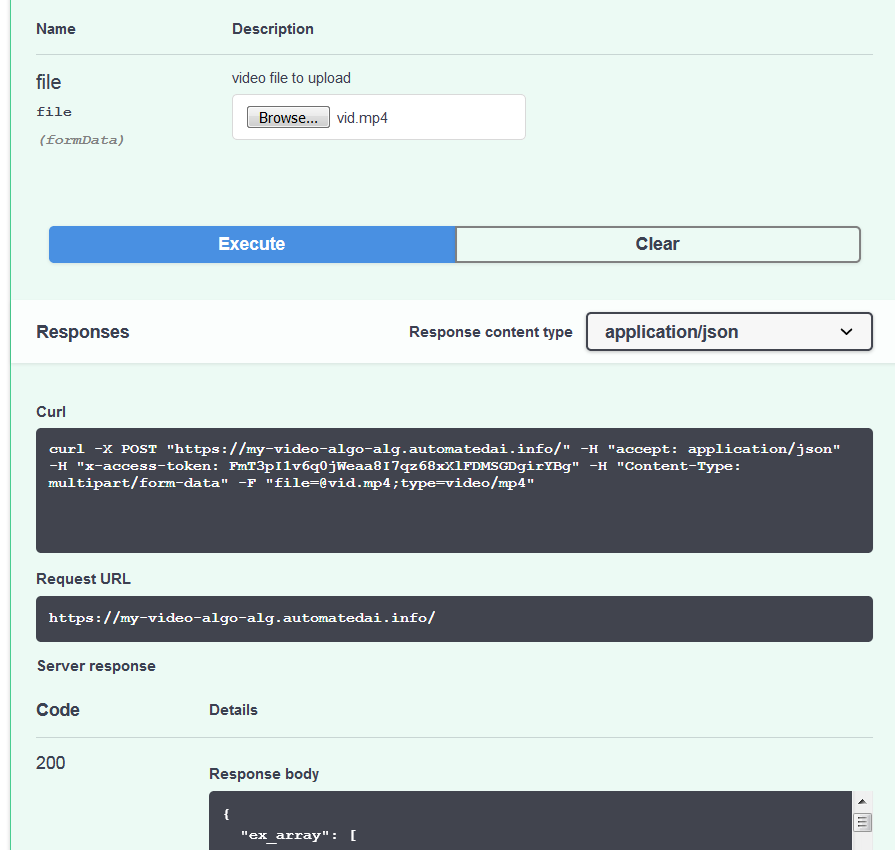
Testing with Swagger
Using Swagger
- You should see an output JSON from the algorithm. In this case it is a JSON string.
- You can now select different languages for the client to be generated.
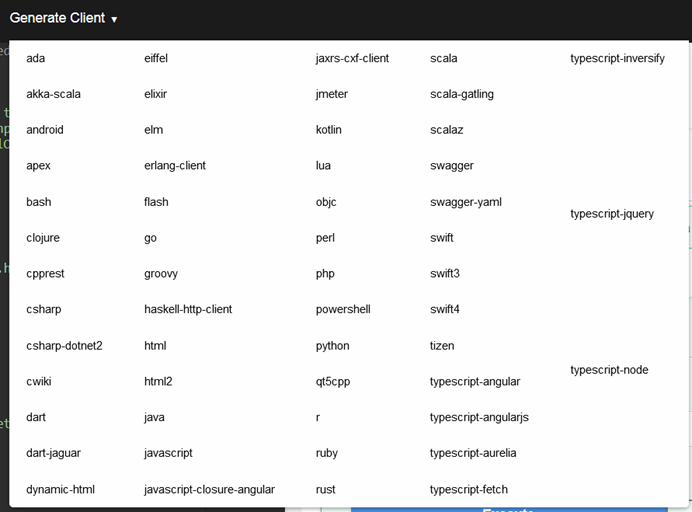
Swagger Clients
The Magic of Generating Clients with Swagger
- With the Swagger test of the API working correctly generate clients in languages based on needs.
- Select from one of the many languages the code is automatically generated.
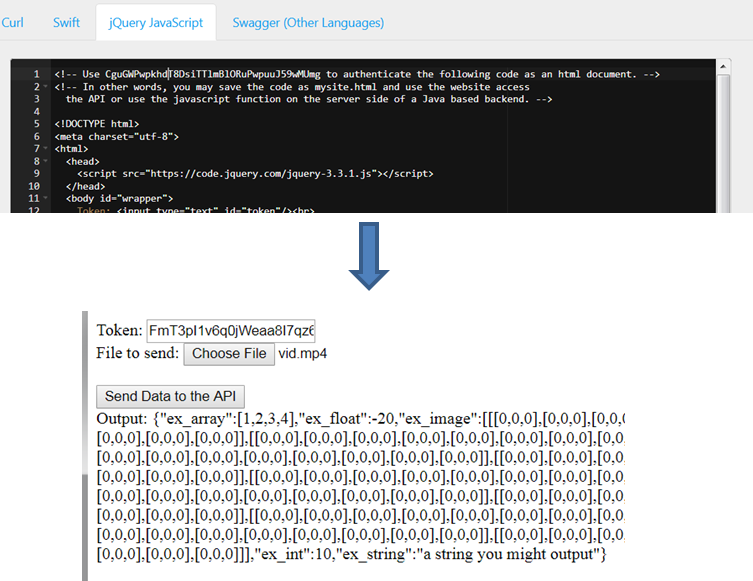
Using jQuery Client Website
Use the JQuery HTML code to create a client demo website
- Copy the HTML code generated into a .html file.
- Open the file in a browser.
- Paste the Token copied from the top of the generated code into the Token field.
- Send the data to the API and the video file generated and downloaded.
Finishing
Click Complete Deployment and Return to user Home in order to finish deploying the algorithm!
- Your Algorithm will not be deploy until clicked.